微信扫码登陆实现流程
本文最后更新于:8 天前
微信扫码登陆实现流程
1 . 账户申请
(1)打开微信开放平台: https://open.weixin.qq.com/ 首先进行账号的注册
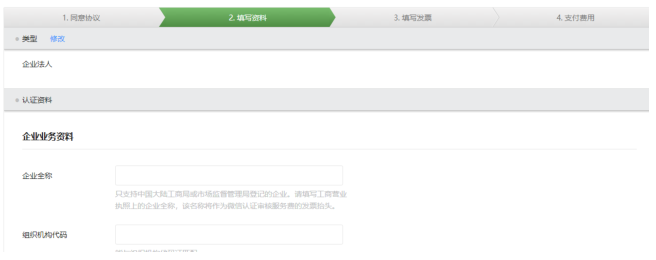
(2)开发者资质认证
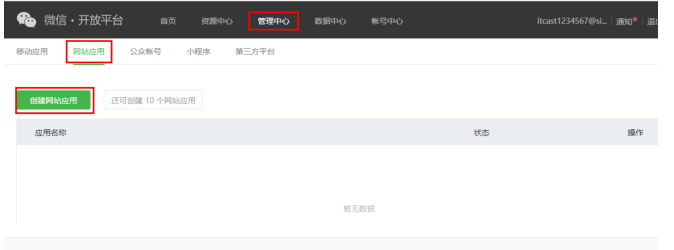
(3)创建网站应用
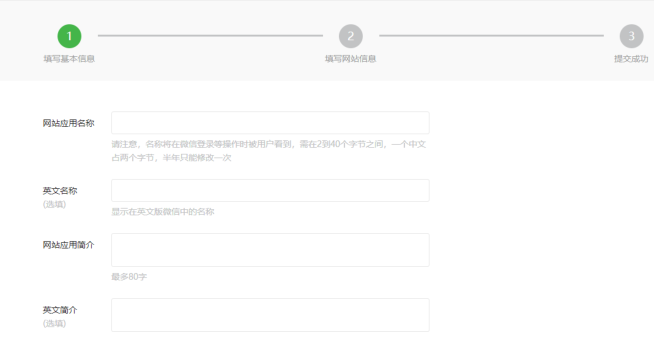
填写应用的相关信息
应用通过审核后,会得到AppID和 AppSecret,后边进行编码中会使用。
AppID : wx3bdb1192c22883f3
AppSecret : db9d6b88821df403e5ff11742e799105
2 . 微信第三方登陆流程
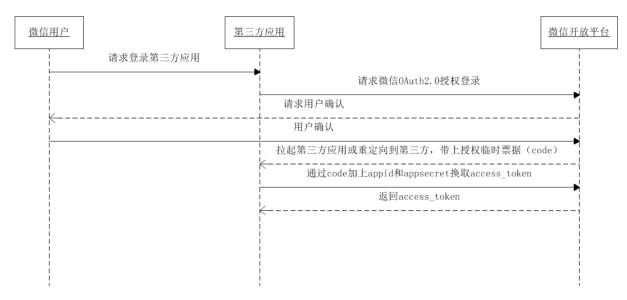
- 第三方发起微信授权登录请求,微信用户允许授权第三方应用后,微信会拉起应用或重定向到第三方网站,并且带上授权临时票据code参数;
- 通过code参数加上AppID和AppSecret等,通过API换取access_token;
- 通过access_token进行接口调用,获取用户基本数据资源或帮助用户实现基本操作。
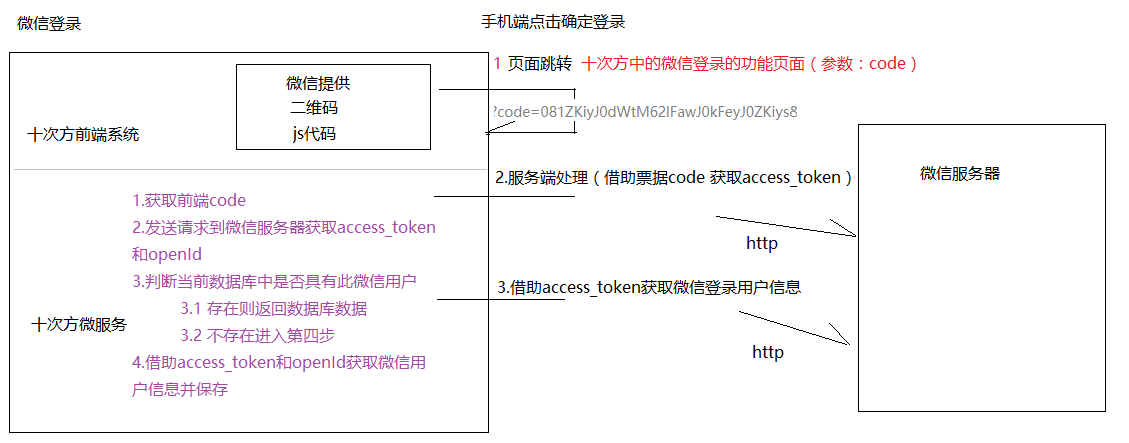
获取access_token时序图:
在本项目中完成微信登录的流程图如下,可以参考
3 . 域名指向
由于使用的是讲师提供的微信账户,此账户绑定了微信扫面之后跳转的域名地址。需要在测试阶段扫描跳转到自己的服务器中,需要进行如下配置:
(1)修改本机host地址指向域名
127.0.0.1 note.java.itcast.cn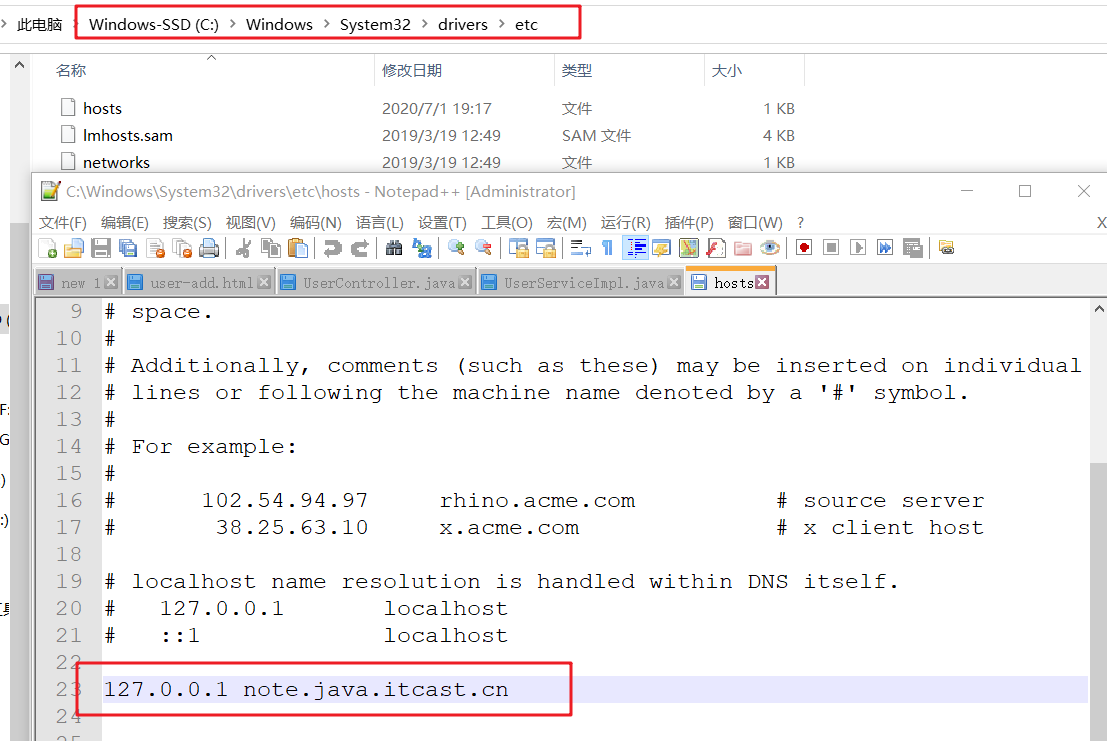
(2)修改tomcat的端口,设置为80
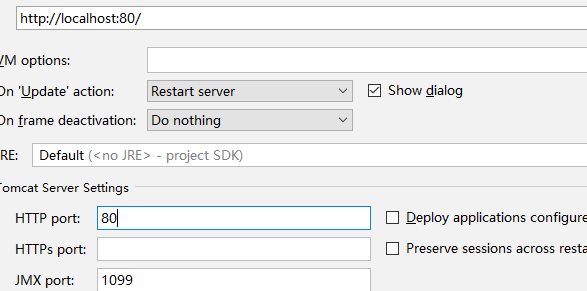
重新启动工程,就可以通过http://note.java.itcast.cn 来访问了。
4 . 获取code
(1)修改login.jsp,在登陆表单下方添加一个div, 用于显示微信登陆二维码(略)
<div id="weixin"></div>(2)修改login.jsp,引入微信登陆二维码js
<script src="../js/wxLogin.js"></script>
<script>
    var obj = new WxLogin({
        self_redirect:false,
        id:"weixin",
        appid: "wx3bdb1192c22883f3",
        scope: "snsapi_login",
        redirect_uri: "http://note.java.itcast.cn/weixinlogin"
    });
</script>
appid: 应用唯一标识
scope:应用授权作用于
redirect_uri:回调地址,是微信登陆成功后要跳转到的页面
(3)扫码测试浏览器显示

我们打开手机用微信扫二维码, 会出现以下提示
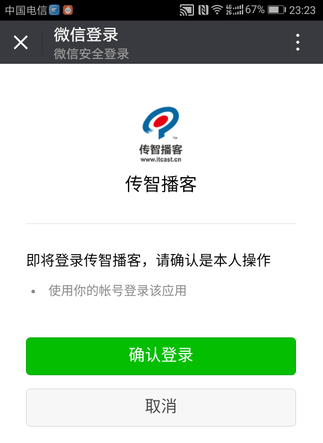
点击确认登陆按钮,浏览器会自动跳转到
http://note.java.itcast.cn/weixinlogin?code=02147Yff12Yhgz0ArCef1qabgf147Yf0&state=undefined
这个code是微信发给用户的临时令牌。我们可以根据code再次请求微信第三方登陆接口得到access_token(正式令牌)
5. 微信登录的微服务
1. 准备工作
(1)在export_parent模块中引入坐标
<!-- fastjson start  -->
<dependency>
    <groupId>com.alibaba</groupId>
    <artifactId>fastjson</artifactId>
    <version>1.1.37</version>
</dependency>
<!-- fastjson end -->

<dependency>
    <groupId>org.apache.httpcomponents</groupId>
    <artifactId>httpclient</artifactId>
    <version>4.5.2</version>
</dependency>
(2)在export_common中添加http请求工具类
package util;

import com.alibaba.fastjson.JSON;
import org.apache.http.HttpEntity;
import org.apache.http.client.methods.CloseableHttpResponse;
import org.apache.http.client.methods.HttpGet;
import org.apache.http.impl.client.CloseableHttpClient;
import org.apache.http.impl.client.HttpClients;
import org.apache.http.util.EntityUtils;
import java.util.HashMap;
import java.util.Map;

public class HttpUtils {

    public static Map<String,Object> sendGet(String url) {
        Map map = new HashMap();
        try{
            //创建HttpClient对象
            CloseableHttpClient client = HttpClients.createDefault() ;
            //创建get请求
            HttpGet get = new HttpGet(url);
            //发送get请求
            CloseableHttpResponse response = client.execute(get) ;
            HttpEntity entity = response.getEntity() ;
            String json = EntityUtils.toString(entity,"utf-8");
            System.out.println(json);
            map = JSON.parseObject(json,Map.class);
        }catch (Exception e) {
            e.printStackTrace();
        }
        return map;
    }
}
(3) 修改用户数据库添加openid字段,用户实体类添加openid属性
略
2 . 用户登录改造
(1)在LongiController中添加微信登录controller接口
//通过微信code登录
@RequestMapping(value="/weixinlogin")
public Result wxLogin(String code){
    User user = userService.wxLogin(code) ;
    if(user==null){
        return new Result(false,StatusCode.LOGINERROR,"微信登录失败");
    }
    Map<String,String> map=new HashMap<>();
    String token = jwtUtil.createJWT(user.getId(), user.getNickname(), "user");
    map.put("token",token);
    map.put("name", user.getNickname());
    map.put("avatar",user.getAvatar());//头像
    return new Result(true,StatusCode.OK,"登陆成功",map);
}
(2)在service中添加微信登录业务逻辑
@Value("${wx.appid}")
private String appid;
@Value("${wx.secret}")
private String secret;
@Value("${wx.accessTokenUrl}")
private String accessTokenUrl;
@Value("${wx.wxInfoUrl}")
private String wxInfoUrl;

public User wxLogin(String code) {
    User user = null;
    //1.根据code获取access_token和openId
    String atUtl = accessTokenUrl + "?code="+code+"&appid="+appid+"&secret="+secret+"&grant_type=authorization_code";
    System.out.println(atUtl);
    Map<String, Object> map1 = HttpUtils.sendGet(atUtl);
    Object access_token = map1.get("access_token");
    Object openid = map1.get("openid").toString();
    if(access_token == null && openid == null) {
        return user;
    }

    //2.根据openId判断用户是否存在
    user = userDao.findByOpenid(openid.toString());
    if(user != null) {
        System.out.println("返回数据库中的用户对象");
        //3.如果用户存在返回用户信息
        return user;
    }else{
        System.out.println("查询微信数据库");
        //4.如果用户不存在,根据access_token和openId获取微信用户信息
        String wxurl = wxInfoUrl + "?access_token=" + access_token +"&openid="+openid;
        Map<String, Object> map2 = HttpUtils.sendGet(wxurl);
        Object nickname = map2.get("nickname");
        Object headimgurl = map2.get("headimgurl");
        if(nickname == null || headimgurl == null) {
            return user;
        }
        //5.将微信用户信息保存到数据库,返回用户数据
        user = new User();
        user.setId( idWorker.nextId()+"" );
        user.setRegdate(new Date());//注册日期
        user.setUpdatedate(new Date());//最后修改日期
        user.setLastdate(new Date());//最后登陆日期
        user.setOnline(0L);//登陆时长
        user.setFanscount(0);//粉丝数
        user.setFollowcount(0);//关注数
        user.setOpenid(openid.toString());
        user.setNickname(nickname.toString());
        user.setAvatar(headimgurl.toString());
        userDao.save(user);
    }
    return user;
}
(3)在dao中添加根据openid查询用户的方法
本博客所有文章除特别声明外,均采用 CC BY-SA 4.0 协议 ,转载请注明出处!其他问题请通过下方微信联系!
